+ 한국항공대학교 최차봉 교수님의 임베디드 SW 과목 내용을 정리한 글입니다.
< UART Communication을 통해 LED 제어하기 >
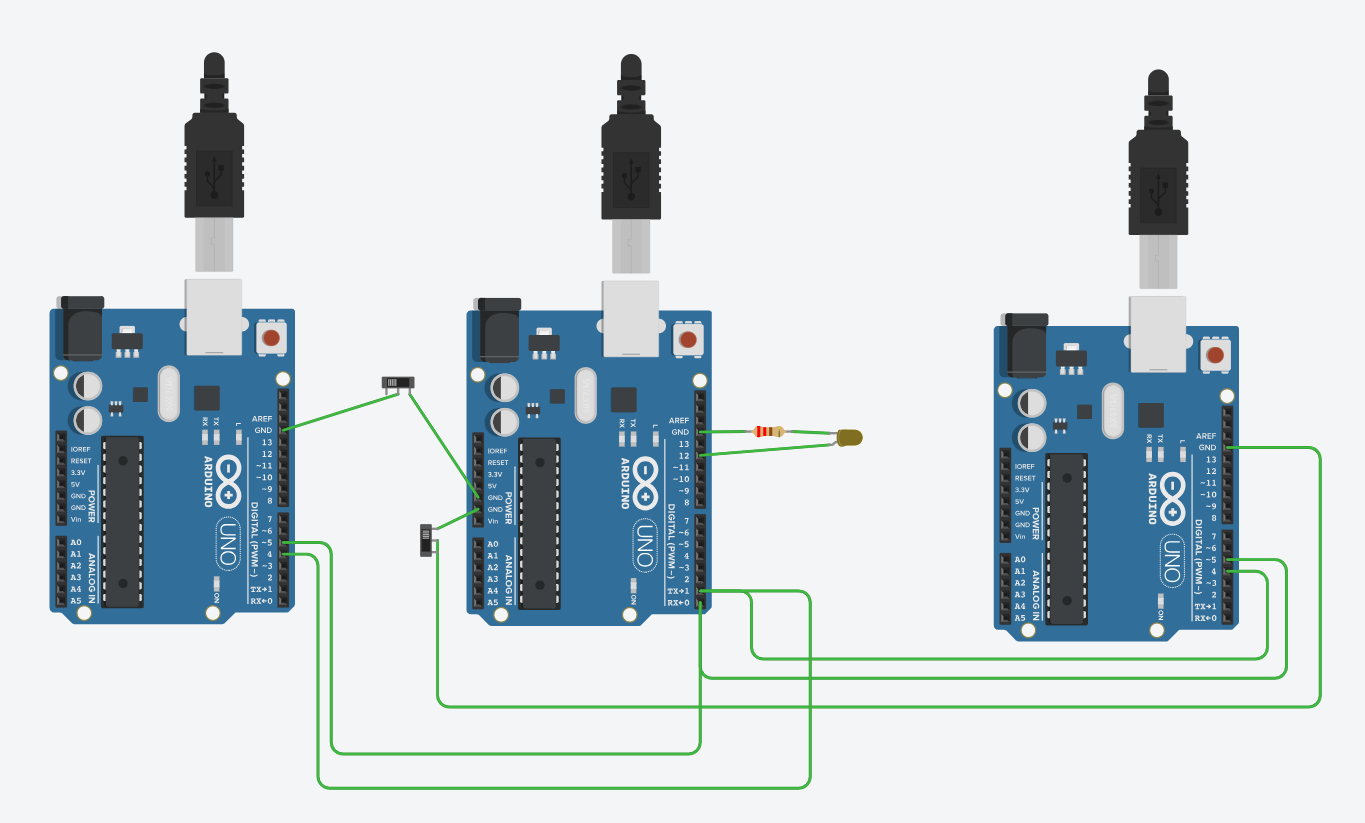
UART를 이용하여 Server / Client를 제작하라.
3명이 한 조가 되어, Server 1대, Client 2대(id로 구분)로 실습한다.
< Message Format >
'#' + <id> + <bn> ( 3 Byte ASCII)
- <id>: Client id이다. '0' 또는 '1'이다.
- <bn>: LED Blink 횟수이다. '0'~'9'이다.
< Server >
Client에서 받은 Data 정보에 따라 LED를 Blink한다.
- Client0에서 Data를 받을 경우, Pin12에 연결된 LED를 점등한다.
- Client1에서 Data를 받을 경우, Pin13에 연결된 LED를 점등한다. (내장 LED)
- Format에 맞지 않는 Data는 Drop한다. (점등 X)
< Client >
Serial Monitor에서 한 Byte 입력을 받아 Format에 맞게 Message를 구성하여 Server로 전송한다.
ex) Client0이 '6'을 입력했을 때 Message: '#' + '0' + '6'
ex) Client1이 '6'을 입력했을 때 Message: '#' + '1' + '6'
< UART Client - Server 연결 >
Server Pin1(TX) - Client Pin4(RX) & Server Pin0(RX)
- Client Pin5(TX)Client는 Sortware Serial로 구성한다.
- Server는 프로그램 업로드 후 IDE를 종료하여 아두이노에 전원만 공급한 상태에서 Client의 Serial Moniter에서 Blink 횟수를 입력한다.
+ 아두이노는 데이터를 받으면 버퍼에 임시 저장한다.
+ Serial.available()는 버퍼에 저장된 데이터가 있으면 true를 반환하고, 없으면 false를 반환한다.
+ Serial.read()는 버퍼에 받아둔 데이터를 1Byte씩 가져온다.

< Server 코드 >
// Server Code

void setup()
{
  Serial.begin(9600);
  pinMode(12, OUTPUT);
}

void loop()
{
  if(Serial.available()){
    if(Serial.read() == '#'){
      while(!Serial.available()); // 버퍼에 데이터가 들어올 때까지 대기
      char id = Serial.read(); // 버퍼에서 데이터를 1Byte 가져오기
      while(!Serial.available());
      char n = Serial.read();

      n = n - '0'; // 문자로 받은 n을 숫자 n으로 변환

      if (id == '0'){
      	for(int i = 0; i < n; i++){
      	  digitalWrite(12, HIGH);
          delay(500);
          digitalWrite(12, LOW);
          delay(500);
        }
      }
      else if(id == '1'){
        for(int i = 0; i < n; i++){
      	  digitalWrite(13, HIGH);
          delay(500);
          digitalWrite(13, LOW);
          delay(500);
        }
      }
    }
  }
}
< Client 0 코드 >
#include <SoftwareSerial.h>

SoftwareSerial MySerial(4, 5); // RX=4, TX=5
#define MyID '0'

void setup()
{
  Serial.begin(9600);
  MySerial.begin(9600);
}

void loop()
{
  if (Serial.available()){
    char c = Serial.read();
    MySerial.write('#'); // 데이터 전송
    MySerial.write(MyID);
    MySerial.write(c);
  }
}
< Client 1 코드 >
#include <SoftwareSerial.h>

SoftwareSerial MySerial(4, 5); // RX=4, TX=5
#define MyID '1'

void setup()
{
  Serial.begin(9600);
  MySerial.begin(9600);
}

void loop()
{
  if (Serial.available()){
    char c = Serial.read();
    MySerial.write('#');
    MySerial.write(MyID);
    MySerial.write(c);
    Serial.println(c);
  }
}
+ 동시에 Client1, Client0이 접속될 수 없다.
'Computer Science > Embedded Software' 카테고리의 다른 글
| [Embedded Software] SPI Communication 실습 (2) | 2023.10.18 |
|---|---|
| [Embedded Software] SPI Communication (0) | 2023.10.18 |
| [Embedded Software] Serial Communications (0) | 2023.10.11 |
| [Embedded Software] PWM 실습 (1) | 2023.10.05 |
| [Embedded Software] Interrupt 실습 (0) | 2023.09.27 |


